Showing posts with label cooking. Show all posts

DIY Homemade Fruit Strips

I love fruit gummy snacks. They were my favorite dessert in my lunchbox when I was a kid, and I still pack them in my lunch on days when I go to work as a substitute. In an effort to start cutting out processed foods, I have been looking for recipes of my favorite go-to snacks (fruit snacks, yogurt, popcorn, and granola bars). This past weekend I tried out a recipe for home made fruit strips (similar to fruit roll-ups.)


The ingredients are simple:


  • 2 cups berries (fresh or if frozen, then thawed)

  • 2 Tbsp honey

Berries are one of the fruits that I will only by organic, since the conventional grown berries are heavily sprayed. This time of year the fresh organic berries are VERY expensive, and hard to to find. So I buy frozen organic berries, you can get a lot for your money!


Mix the berries and honey in the blender until pureed. I should have done a few more seconds because I had three random whole berries when I poured the mixture out.


Line a baking pan with parchment paper, and pour the mixture onto the pan. Make sure to evenly spread the berry mixture to fill the pan.


Place the pan in the oven and cook on 200 degrees F for 3 to 4 hours. Check often, you want the mixture to feel dry and no longer sticky.


Cool the pan on a wire rack, the longer you allow it to cool the better.


Cut into strips. I found it easier to to just peel off the pan and tear into pieces as my fruit strips didn't easily cut with a pizza cutter.


The end results look more like beef jerky then fruit roll-ups, but they tasted delicious. I would suggest not using strawberries because the seeds got stuck in my teeth. I will be definitely be making these again!

Read more...

Weekend Cooking

This weekend was super busy, but I was able to make two things that I have wanted to make for a while:


  1. Mixed berry freezer jam

  2. Dill pickles

They were both incredibly easy to make (I don't know why I waited so long!) and neither one of them required traditional canning materials or methods. In fact I made both during Silas' afternoon nap.


I found the simple Jam recipe in the July 2011 issue of Real Simple. The original recipe called for 5 cups of blueberries, but Brett's favorite jam is raspberry so I substituted for raspberries, I also added some blueberries and strawberries from the fridge that needed to be used.


Berry Jam


5 cups berries

1/2 cup of sugar

1 tbsp fresh lemon juice

1/4 tsp kosher salt (I never have kosher salt, so I use the regular salt that I have in my pantry.
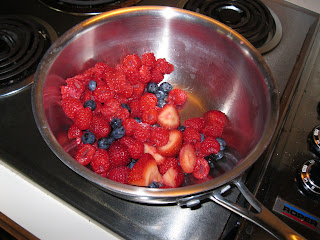


In a medium saucepan, combine the berries, sugar, lemon juice, and salt. Mash with a masher or wooden spoon until all the berries have released their juices


Cook over medium-high heat, stirring occasionally, until the mixture has thickened, 18 to 25 minutes. Transfer to container and refrigerate for up to 1 month or freeze for up to a year.


  • TIP: this recipe can also be made with frozen berries: 2 10oz bags. Cook the frozen berries for 2 to 3 minutes before mashing.


I stored my jam in a little glass Pyrex bowl.


The dill pickles were just as easy to make too.


Dill Pickles


1 cup white vinegar


1 cup sugar (the pickles turned out a little sweeter than I liked, so I think next time I am going to add about a 1/2 cup sugar)


1 1/2 tsp salt


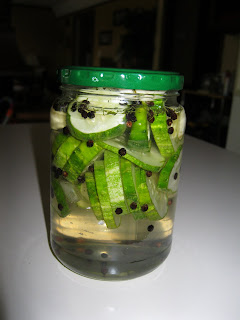
1 pound pickling cucumbers or baby cucumbers, ends trimmed and sliced


8 garlic cloves


2 tsp black peppercorns


2 large seed heads fresh dill (my grocery store was out of fresh dill so I had to substitute with dried dill)


In a medium saucepan over medium-high heat, combine 1 cup water, vinegar, sugar and salt, and bring to a boil. Stir until the sugar and salt dissolve. Let mixture cool to room temperature.


Place pickles, garlic and peppercorns into a jar. Stuff the dill seed head into the center of the jar. Pour the cooled mixture over the pickles. Screw the lid onto the jar, shake well and refrigerate for 24 hours before using. Keep refrigerated for up to 1 year.

Yesterday was also a very special day for me and my family. I got the privilege of baptising my mom at Lee's Summit Community Church. My mom's faith has been growing for a number of years. She has gotten pretty involved in the women's ministry at her church, even becoming a group leader of the Single Woman's Bible study. I had been praying for a number of years that she would meet and become friends with mature Christian women. I was thrilled when she told me she was going to be getting baptised, but then I was shocked when she asked me to do it!


Apparently since her church is so large, the pastors let you choose a person to baptise you as long as they have their own personal relationship with the Lord. Tears came to my eyes yesterday morning as my mom shared her testimony in church before the baptism. All of those prayers for so many years have been answered. It was a special day for my mom, one that I will always treasure.

Read more...

A New Favorite Summer Treat

This week I discovered a new favorite summer drink. I was reading about Money Saving Mom's weekly menu when I came across her link for a Watermelon Frostie. I looked up the recipe and decided to give it a try because it sounded really good!


I adapted the recipe because the original version calls for including maple syrup which I am not a fan of because many varieties have HFCS (high fructose corn syrup). There are more expensive brands that do not contain HFCS but for the little amount that I actually use maple syrup, I can't justify into the grocery budget. So here is my adapted version of the recipe:


Watermelon Frostie


2 1/2 cups of frozen watermelon cubes

1 cup frozen strawberries

1 banana

1 lemon squeezed for juice


Combine all ingredients in the blender and blend until slightly smooth. I like a little chunk in my frosties and smoothies.


I was pretty excited that I had all the ingredients. We had a lot of watermelon left over from the Fourth of July and I hate to throw away fruit that is starting to go bad. So now I freeze all my fruit that is starting to look a little pathetic for smoothies and frosties!


Here is a picture:


I wish I could say that while I was enjoying this most delicious (and healthy!) afternoon snack I was doing something exciting, like reading a book on my back deck soaking up some rays. But I wasn't. Instead, while I was indulging myself with this treat, I was simply nursing my son.


I say "simply" because that is the truth, but honestly I wouldn't trade that time for anything else, including reading a book on the back deck (one of my favorite summer activities). I love the peaceful, tranquil times that Silas and I spend together every day, several times a day. A time that no one else gets to spend with him. My favorite moments together bonding in a way that is so meaningful and important to his well being.

Read more...

3 B's: Bread Baking, Birthday and Baby Boy

This week was quite an eventful week for me. All three events starting with the letter B! The best thing about the week happened on Monday when Brett and I had our first ultrasound of the pregnancy. We had been waiting anxiously to see what our little one looked like and to make sure he was developing healthy. We also got to find out that Baby Osborn was, in fact a boy! We were so thrilled. Both Brett and I wanted a little boy more than anything. Everyone kept telling us that it was going to be a girl through. Even our Bradley instructor thought it was going to be a girl. So I was mentally preparing myself for a girl. I knew that I would be delighted to have a girl, but there is family significance to having a boy. I even had a dream the night before that it was a girl, so I was pretty sure that I was having a girl. When we got into the room, the nurse told us she wouldn't tell us, rather let us try and figure out on our own. At first it was hard to even figure out what I was looking at, but then he moved his legs. I couldn't believe what I saw! I was speechless when the nurse asked me what it was, because I was afraid to jinx myself. Then Brett boldly asked, "Is it a boy?!?" The nurse said yes, and I burst out into tears of joy I couldn't believe my eyes, it was the second best thing I heard since becoming pregnant (the first being when we got to hear the heartbeat for the first time).


Here is a picture of his little, perfect foot!

and here he makes his grand debut with his first picture.

The second fun thing about this week was bread baking day at school. Every fall the fourth grade makes Bread-in-a-Bag. A retired teacher provides all the supplies and she even makes each student a jar of jelly. She and two other retired teachers (one who I got to teach with my first two years) come up to school to teach the fourth graders how to make bread. The kids love it and the whole school smells so good for the day. At the end of the day the students take home a bag with a whole loaf of bread that they made, a jar of jelly and the directions with the recipe so they can try it at home with their family. It really is an easy process!


Here is the recipe:

Mix 4 cups of flour, 1 package of yeast, 3 tablespoons of sugar and 1 teaspoon of salt in a large gallon zip lock bag. Close the bag and shake to mix well. Open the bag to add 1 1/2 cups of hot water and 3 tablespoons of vegetable oil. Close the bag, and with your fingers, knead the dough until well incorporated. (The students loved this part, and since everything was in the bag, no mess on the desks or their hands!) You may add more flour if the dough is still sticky.


Spray bread pans with vegetable spray. Divide the dough into two equal halves. (Each bag makes two loaves of bread.) Put the dough into the bread pans and spray with vegetable spray. Let rise in a warm place. Bake at 375 degrees for 35-40 minutes. Let cool, then remove from pans. So easy! Plus you could easily add other spices like fresh rosemary or cinnamon.

At the end of the day we let the student try a little bit of the bread with the jelly and butter. We made our own butter too. All we did was put heavy cream in small little containers, seal tightly, and passed them around the classroom as the students took turns shaking the cream until it harden. We added a little salt for flavor, but it was pretty easy. Our kids loved the day! I loved the day too, except I was totally exhausted at the end of the day being on my feet all day and leaning over their desks to help knead.
Along with both these events, yesterday I celebrated my birthday with wonderful husband. He brought flowers home from work the night before, and we had dinner at my favorite Italian restaurant (we both agreed on no birthday gifts for each other this year as we are saving money and getting ready to bring our little boy into the world!) It was the end to a perfect week!

Read more...

What's cooking at my house

So now that it is summer, my absolute favorite thing to do is spend time pondering over cookbooks and going through my recipe clippings, to try out new recipes. During the school year I also try to do that to, I just don't get to try out as many as I would like. Back in March I discovered three wonderful recipes and combined them together to make one delicious meal that is now one of our favorite dinners:
Oven-Fried (Baked) chicken, oven fries and spicy gravy, salad with home-made vinaigrette and rosemary biscuits.

Oven-Fried (Baked) chicken I found in the Food Network magazine, but I adapted it a bit.
1 1/2 cups of crispy rice cereal (like Chex)
2 1/4 cups bagel chips or Melba toasts
5 tsp extra-virgin olive oil
3/4 tsp paprika
sea salt and ground black pepper to taste
1 container of plain Greek yogurt
1 tsp dijon mustard
skinless, boneless chicken breasts of thighs ( I have used both in this recipe and both are very good, I usually just choose which ever is cheaper at the store)

1. Preheat oven to 475F. Coat the baking sheet or glassware with cooking spray.
2. Grind the cereal and bagel chips in a food processor and transfer to a large resealable plastic bag.
I have also substituted rice chex with corn chex and it tastes really good too. Once I had pita chips instead of bagel chips and that tasted great too. My dad has also uses pretzels to bread with, I haven't tried that one yet, but he said it was great. I have also thrown in bread crumbs to on occasion.
Add 3 tsp olive oil, the paprika, 2 tsp salt, and pepper.
3. Whisk the yogurt and mustard in a shallow bowl. Add the chicken and coat. Transfer chicken to bag, seal and shake to dredge the chicken until well coated. Transfer chicken to baking dish and mist with cooking spray. Bake until the chicken is crisp and done, about 30 minutes.

I have always loved breaded chicken, but Brett is allergic to eggs and most recipes call for soaking the chicken in an egg mixture. I was glad when I found this recipe, because Greek yogurt is so good and good for you.

Oven Fries and Spicy Gravy- I found this recipe watching the Rachel Ray Show (www.rachelrayshow.com/food/recipes/oven-fries-and-spicy-gravy/
4 medium starchy potatoes cut into 10 wedges or so (I usually use Russet)
2 tbsp Extra Virgin Olive Oil
Steak seasoning or salt and pepper (I use the Hy-vee brand steak seasoning and it is so good)
3 tbsp butter
2 tbsp flour
2 tbsp grainy mustard (I use French's spicy brown mustard)
2 tbsp Worcestershire sauce
2 cups chicken stock (I have also used vegetable broth when I was out of chicken stock)

Heat oven to 450F. (When I cook this with the fried chicken, I just leave the oven at 475 and just watch the potatoes.
Cut potatoes and drizzle with oil, and seasoning blend. Arrange on foil lined baking sheet (foil allows for easy clean up, and I found that if you spray the foil, then the fries do not stick. Bake 40-45 minutes or so, turning pan and flipping the potatoes halfway.
Gravy
Heat a medium pot over medium to medium-high hear. Melt butter, whisk in flour and cook for 30 seconds to 1 minute. Whisk in mustard, W. sauce and stock. Let gravy thicken a couple of minutes or so until it coats the back of a spoon ( I have found that this usually takes a while, the longer the sits, the thicker and better it gets. This recipe has taken me a few tries to get it to the perfect constancy).
Pour into individual cup and serve for dipping. Dipping the chicken into the gravy also tastes great!

For the salad, just chop up some greens and make your own dressing. I found this dressing in a Martha Stewart magazine.
Rose's Vinaigrette
1 tbsp minced garlic or shallot (I use garlic because I always have garlic around)
1 tsp Dijon mustard
1tsp light-brown sugar
3/4 tsp sea salt
1/4 tsp black ground pepper
1/4 tsp W. sauce
2 1/2 tbsp red-wine vinegar (I prefer the taste of red-wine vinegar but I'm sure you could easily switch is out for balsamic vinegar)
2 tbsp fresh lemon juice (about a half of a lemon)
3/4 cups of extra virgin olive oil.

1. In a small bowl, mash together the garlic, mustard, sugar, salt, pepper, and W. sauce.
2. Pour in the vinegar, lemon juice, and olive oil. Pour mixture into a jar or cruete. Over tightly and shake well to combine. Add salt and pepper to taste. Use immediately or store in the refrigerator.

Lastly for the rosemary biscuits I just use a box of Jiffy buttermilk biscuit mix (usually less than $0.50!) I make the drop recipe that is on the side of the box. I follow the recipe as written and add freshly snipped and chopped rosemary, bake and enjoy!

Hope you enjoy these recipes as much and Brett and I have.

Read more...
Related Posts Plugin for WordPress, Blogger...

  © Blogger template Shush by Ourblogtemplates.com 2009

Back to TOP